As an excellent MTS conversion software, 4Video MTS Converter possesses the advanced converting function to help you easily convert MTS format to other popular video formats such as AVI, MP4, WMV, MOV, FLV and MPG with great converting speed and excellent image/sound quality. Besides, you can use this software to convert audio formats and extract audio files from video files.
The editing functions of 4Video MTS Converter include adjusting the effect of output video, trimming the output length of video or audio, cropping video playing area, adding watermark on the video screen, and joining video clips.
Processor: Intel® processor and M1&M2 chip
OS Supported: Mac OS X 10.7 or above
Hardware Requirements: 512MB RAM, Super VGA (800×600) resolution, 16-bit graphics card or higher
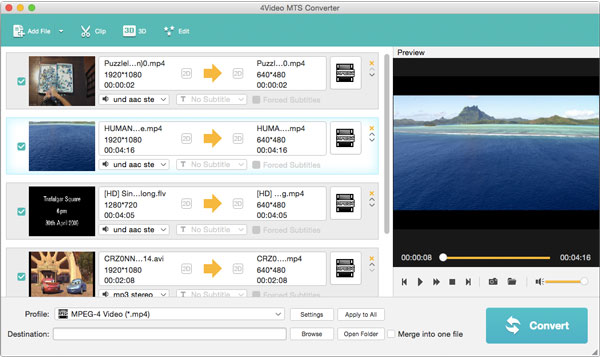
1. Click Add Video button to add video or audio files from your local disk.
2. Set output format, video/audio encoding settings and output folder for the added files.
3. Click Convert button to start conversion.
Choose the Preferences option in the top menu to open the Preference window.
Output: Set the destination for the converted files and snapshot picture, and choose the output format of the snapshot image.
Click Settings button to open the Settings window.
You can select Encoder, Frame Rate, Resolution, Aspect Ratio and Video Bitrate to set video and select Encoder, Channels, Audio Bitrate and Sample Rate to set audio.
Tips:
1. For Resolution setting, you can choose the pre-set resolution from the right drop-down list. Also, you can directly input your own resolution as the form of "XXX*XXX".
2. You can customize the video and audio encoding settings and save them as your own profile. After you have chosen the encoding options, just click the Save as... button and name your profile, and then the profile will be saved in the User Defined list. You can use the customized profile next time by selecting it from the list, also you can delete the profile you defined by clicking "Delete" button.
3. In the Channels setting, you can choose 5.1 channels while the audio channel of your source file is 5.1.
Click Effect button in the main interace to open the Effect editing window.
Drag the Brightness, Contrast, Saturation, Hue and Volume Effect scroll bars to get the video effect you want. Also, you can click the up or down arrows on the right side of each scroll bar to set corresponding value.
Deinterlacing: To convert the interlaced source file, check Deinterlacing function to avoid mosaic for the output file.
Click Clip button in the main interace to open the Clip editing window.
There are four methods to clip your video length:
Method One: Drag the "Start Point" scissors to mark the beginning of the clip, and drag the "End Point" scissors to mark the end of the clip when you preview.
Method Two: Press the "Mark In" button to mark the beginning of your clip and "Mark Out" button to mark the end of your clip.
Method Three: Input the start time in the "Start Time" box, and then input the end time in the "End Time" box and click "OK".
Method Four: Click the up or down arrows to get desired time value.
After you set trim time, the length of the captured clip will be shown in the Select Length box for your reference.
Click Crop button in the main interace to open the Crop editing window.
Keep Aspect Ratio: Choose Original, Crop area, 16:9, 4:3 or just set the position of Left, Right, Width and Height.
Zoom Mode: Define the size of active portion of output video. Choose Letterbox, Medium, Pan & Scan and Full.
After you crop your video and set the zoom mode, the result can be previewed in the Output Preview window simultaneously.
Text: Input the text you attempt to use as watermark in textbox. It will appear on the screen of the video file at the same time. Click "Font" button to edit the font of text and click "Color" button to specify the image you attempt to use.
Picture: Check "Select watermark picture" to add image on the screen of the video file.
You can click the up or down arrows of Left, Top, Width and Height or input corresponding values to adjust the position of watermark. Another way is to drag the watermark to any place in the video screen.
Also, you can click the up or down arrows of "Transparency" to adjust watermark transparency.
You can choose the subtitle or audio track avaliable in the source files for the output file.
Use the Shift or Command key to select two or more files that you want to join, and then click Merge button. After conversion, these selected files will be joined into one file.
You can capture pictures when you preview video. Click "Snapshot" button, the current picture in the preview window will be captured and saved in the specified folder automatically. Click "Open Snapshot Folder" button to open the storing folder to view the captured pictures. In the preference window, you can set the snapshot format and snapshot folder for captured pictures.
If you have any questions, please do not hesitate to contact us through our e-mail: macsupport@4videosoft.com
User Help


