Sometimes, you use the video converters like Video Converter Platinum, Video Converter Ultimate or MXF Converter with the 3D function. For further customizing, you can edit the video before converting following the steps below. It is a little different from the standard video converting software.
After you having loading the video files you want to convert, then click the "Edit" button on the main interface to open the "Edit" Window. Then you can click the tags of 3D (for outputting 3D video only), Crop, Effect, Watermark and Audio to do the corresponding operations.
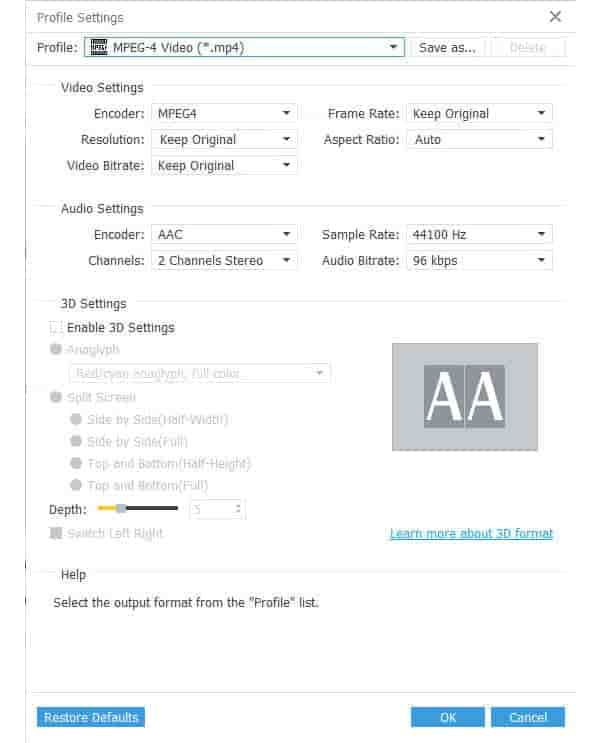
1 3D Settings (for 3D videos only)
Click "3D" tag to open the "3D" window.
Check the "Enable 3D Settings" checkbox, and then you can choose the 3D setting modes (Anaglyph or Split Screen )according to your device. It allows you to choose the 3D depth and switch the left and right eye's image.
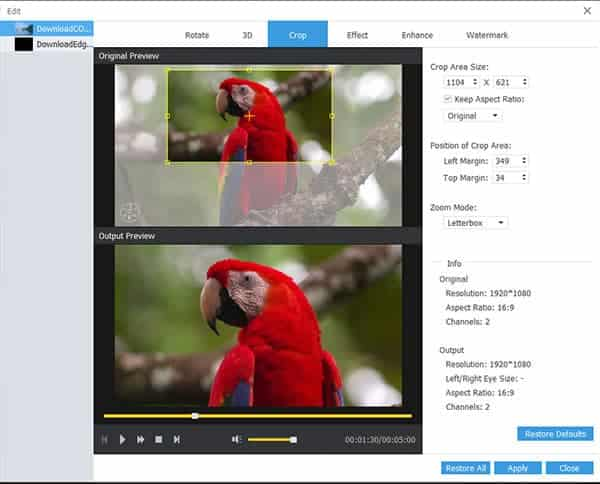
2 Crop Video File
Click "Crop" tag to open the "Crop" window. Then you can freely adjust the video aspect ratio and crop the video frame.
There are four values are provided in the drop-down list of Aspect Ratio for you to choose: Original, Keep Area, 16:9 and 4:3.
It is easy for you to crop the video frame and size just by drag the adjustment boxes in the preview window. Also you can finish by define the crop area size and position of crop area.
Four zoom modes (Letterbox, Pan and Scan, Medium and Full) are provided for you to choose according to your viewing need.
3 Adjust Video Effect
Click "Effect" tag to enter the "Effect" window, then you can freely adjust the video brightness, contrast, saturation and hue by dragging the scroll bars, inputting the values or clicking the Up and Down arrows of each one.
Check "Deinterlacing" to remove the masaic.

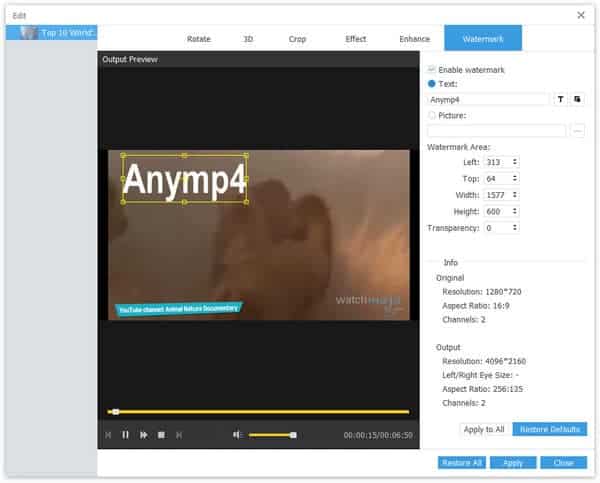
4 Add Watermark
Click "watermark" tag can open the "Watermark" window. Check "Enable Watermark" to choose adding text or image watermark. It allows you to adjust the position and transparency of watermark. For text watermark, you can define the color and font size of the watermark.
5 Adjust Audio Volume
Click "Audio" tag to open the "Audio" window to adjust the audio volume for the output video.
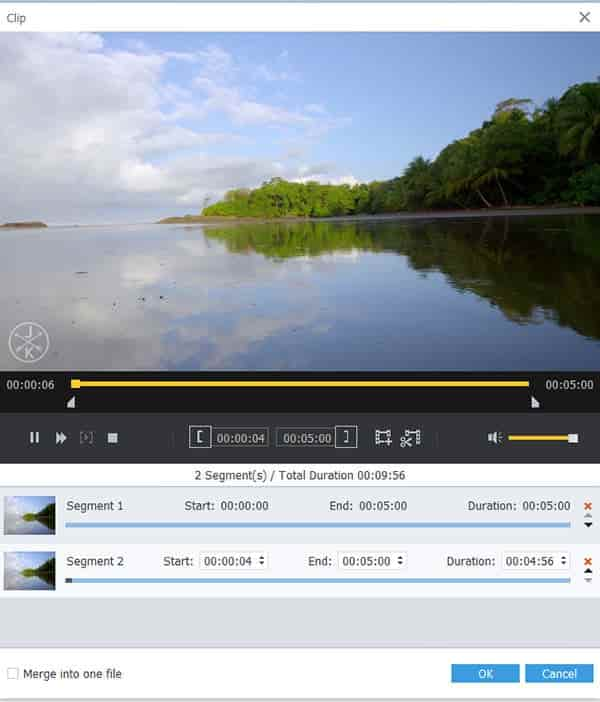
6 Clip Video File
If you want to clip segment(s) from the source video, you can click "Clip" button on the main interface to open the "Clip" window. It allows you to clip one segment or more segments.
You can drag the "Start Point" and "End Point" scissors to mark the beginning and end of the clip segment. Also you can press the "Mark In" and "Mark Out" buttons to set the beginning and ending of the clip, input the correct start and end time of the clip in the "Start Time" and "End Time" boxes, or click the up and down arrows to get the exact time length.
To get more segments, just click the "New Clip" button to start a new segment. You will see the new segment on the file list. And you can also add new clip on this new segment.
After clipping all segments, then click "OK" button, all the segments will be shown in the file list on the main interface.
7 Merge Video Files
Select several video files in the file list, then click the "Merge" button Add Video Watermarkon the main interface, then all the selected files will be merge into one file and the new video will be displayed at the bottom of the loaded file list.


