Introduction
With powerful converting function and easy-to-use feature, 4Videosoft MP4 Converter brings a lot of surprise to us, which not only enables you to convert FLV, MOV, WMV, MPEG, MKV, 3GP and other popular formats to MP4 that can be played by iPad, iPod, iPhone, PSP, Gphone and iRiver, but also can convert audio files and extract audio from video with fast speed and excellent converting effect.
4Videosoft MP4 Converter provides you with the perfect editing functions including effecting, trimming, cropping, watermarking, and merging to optimize your favorite video. You can set the Brightness, Contrast, Saturation, Hue and Volume to adjust output video effect, trim any source file to get desired output length, even crop the frame of video and add image/text watermark to your video, as well as merge several files into one file.
Key Features :
1. Select audio track or subtitle for output video.
2. Merge several selected files into one file.
3. Capture your favorite pictures when you preview video.
4. Optional Aspect Ratio Settings & Zoom Modes to realize different output video play requirements.
5. All the parameters of profile can be provided for you to choose the exact settings for your players, and all those parameters can be saved as user-defined profile for your future use.
6. The whole process of conversion can be finished in a few clicks.
7. Multi-language interface fits for users world-wide.
System Requirements
OS Supported: Windows XP (SP2 or later), Windows Vista, Windows 7, Windows 8, Windows 10, Windows 11
CPU: 1.2GHz Intel or AMD CPU, or above
RAM: 1G RAM or more
Supported Input File Formats
| Video | MPG, MPEG-1, MPEG-2, MPEG-4, MJPEG, VOB, DAT, MP4, DivX, XviD, M4V, TS, MTS, M2TS, RM, RMVB, WMV, ASF, MKV, AVI, 3GP, 3G2, F4V, FLV, SWF, MPV, MOD, TOD, QT, MOV, DV, DIF, MJPG, TP, TRP, WebM |
| Audio | MP3, MP2, AAC, AC3, WAV, WMA, M4A, RA, RAM, OGG, AU, AIF, AIFF, APE, FLAC, CUE |
| HD Video | MTS, TS, M2TS, MPG, MPEG, MP4, WMV, QuickTime HD MOV |
Supported Output File Formats
| Video | MPG, MPEG-1, MPEG-2, MPEG-4, H.264, H.264/MPEG-4 AVC, DivX, XviD, AVI, FLV, MP4, M4V, MKV, MOV, 3GP, 3G2, MTV, SWF, WMV, ASF, DPG, TS, DV, VOB, AMV, WebM |
| Audio | AAC, AC3, AIFF, AMR, AU, FLAC, M4A, MKA, MP2, MP3, OGG, WAV, WMA |
| HD Video | H.264/MPEG-4 AVC, AVI, ASF, MKV, MOV, MPG, TS, WMV, MP4, WebM |
Supported Devices
| Apple Devices | iPhone: iPhone 17/Air/17 Pro/17 Pro Max, iPhone 16/16 Plus/16 Pro/16 Pro Max, iPhone 15/15 Plus/15 Pro/15 Pro Max, iPhone 14/14 Plus/14 Pro/14 Pro Max, iPhone 13/13 Pro/13 Pro Max/13 mini, iPhone 12 Pro Max/12 Pro/12/12 mini, iPhone 11 Pro Max/11 Pro/11, iPhone XS/XS Max, iPhone XR/X, iPhone 8/8 Plus, iPhone 7/7 Plus, iPhone 6S, iPhone 6, iPhone 5, iPhone, iPhone3G iPad: iPad mini 2, iPad Air, iPad 4, iPad mini, The new iPad, iPad 2, iPad 1 iPod: iPod touch, iPod nano, iPod Classic Apple TV |
| Android Devices | Samsung: Samsung Galaxy Note 3, Samsung Galaxy Note II, Samsung Galaxy Note 8/ 10.1, Samsung Galaxy S 4, Samsung Galaxy S III, Samsung Galaxy S, Samsung Galaxy Tab, etc. Sony, HTC, BlackBerry, Nokia, Motorola, LG, etc. |
| TV | Samsung, LG, Sony, Panasonic |
| Game Devices | PSP, PS4, PS3, Xbox, Xbox One, Wii, NDS |
| Editing software | Avid Media Composer, Adobe Premiere/Sony Vegas, Interlaced, DV, PowerPoint |
| Window Devices | Windows Phone 7, Microsoft Surface |
Installation
Follow the steps below to install 4Videosoft MP4 Converter:
Step 1: Download 4Videosoft MP4 Converter installation file.
Step 2: Double click the downloaded installation file to start installation.
Step 3: Follow the instructions to finish the installation.
Uninstallation
There are two methods available to remove 4Videosoft MP4 Converter from your computer:
Method 1: Uninstall 4Videosoft MP4 Converter by the program uninstallation option.
Click Windows Start menu, go to "All Programs", find "4Videosoft MP4 Converter", and select "Uninstall".
Method 2: Uninstall 4Videosoft MP4 Converter from Windows Control Panel.
Click Windows Start menu, go to "Settings" and select "Control Panel" to open Windows Control Panel. Then double click "Add or Remove Programs", find and select the "4Videosoft MP4 Converter" entry, and click "Remove".
Registration

Method One: Click Register from the drop-down menu of Help.
Method Two: Hit the Register icon on the upper-right corner of the program.
Tip: When filling out your registration info, please write purchase e-mail down on the E-mail Address bar and registration code received on the Registration Code address bar.
FAQ:
1. Invalid Registration Code
Reasons for invalid registration code:
1) You'd better copy and paste the code and don't leave spaces before/after/ among characters.
2) Please download the correct product, making sure what you have purchased has same name and platform with the one you download.
3) Registration code of Windows product can't be used on Mac.
2. Loss of Registration Code
You can retrieve your registration code by sending Email to us. What we need is your purchase Email address or order number. Our support Email is support@4videosoft.com.
3. Pop-up error tabs during registration
1) 4001: Registration code unrecorded. Please contact Support at: support@4videosoft.com.
2) 4102: Wrong Email address. Please enter the correct Email when buying the product.
3) 4103: Overdue registration code. Click Help > Purchase on menu toolbar or the purchase icon on the top right corner to purchase so that you can continue to use the code.
4) 4104: Registration code used more than authorized. Please note that one code can only be registered on one PC. If you have changed the mainboard or computer, please contact the Support to update record on server so that you could register again. Our Support is: support@4videosoft.com.
5) 4201: No purchase record. Please contact Support at: support@4videosoft.com.
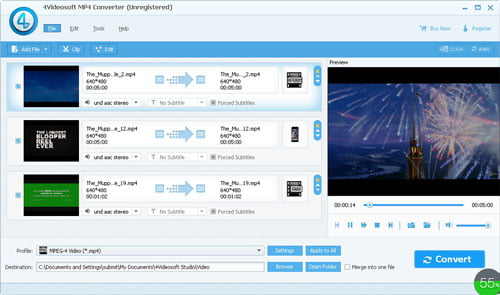
Convert Video
1. Load Source File
Click the Add File icon to add video and audio files from your local disk.
You are allowed to load audio/video file.
Method One: Click the Add File icon to load.
Method Two: Click File on the menu > Add File(s)/Add Folder.
Method Three: Drag and drop the files/folders directly into the program.
Method Four: Right click on the file lists area and choose Add File(s)/Add Folder.
2. Set Output Parameters
You can set the output settings for the selected file in this area
Choose Audio Track and Subtitle
Choose the Audio Track and Subtitle avaliable in the source file for the output file.
Set Profile
Profile: Click drop-down arrow after "Profile" to select an output profile for the selected file that you want to convert. Or just choose the option from the Profile drop-down list in line with the source file in the loaded file list.
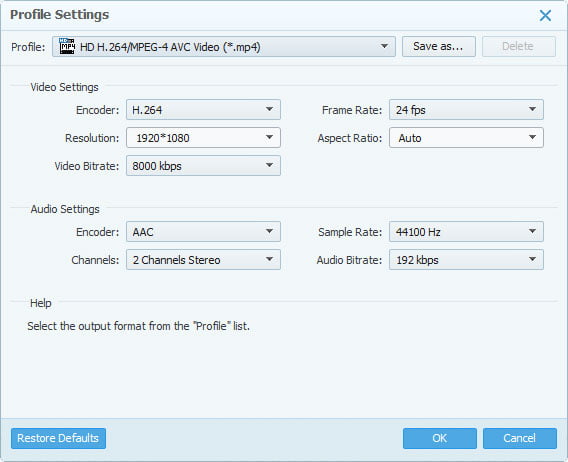
Settings: Click "Settings" button to set detailed profile parameters.
Apply to all: Click "Apply to all" button to apply the current profile to all the files.
Set Destination
Destination: Click "Browse" button to specify a location on your computer to save the converted files.
Tip: If you want to open the output folder, you can just click the "Open Folder" button.

3. Start Converting
Check the file(s) you want to convert in the loaded file list, and then click "Convert" button to start converting.
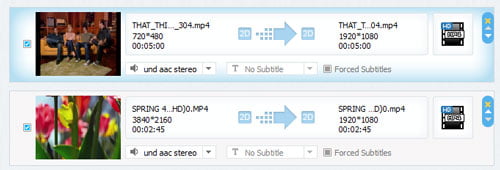
1. File Lists Area
Check file attributes: Right click and choose Properties on this area.
Rename: Right click and choose Properties on this area.
Method One: Select the file and press F2 on the keyboard.
Method Two: Move the mouse to the output fie and click the icon of a pencil.
Method Three: Double click the name of the converted file.
Method Four: Right click on the file and choose Rename.
Move up and down: Move the files up and down by clicking the blue arrows on the right.
Delete a single file:
Method One: Select the file and press F2 on the keyboard.
Method Two: Move the mouse to the output fie and click the icon of a pencil.
Method Three: Double click the name of the converted file.
Delete some or all files:
Delete some files: Choose one file, and long press Ctrl while choosing others to be deleted. Then, put your mouse on the selected files and right click to choose Remove or press Delete from the keyboard.
Delete all: Right click on the file lists area and choose Clear All.
2. FAQ of Loading
1) How to switch language?
Click Tools > Language on Menu bar for selection. There are four language types provided: German, English, French and Japanese.
2) Why is there warning of unsupported format, load failure and DRM protection when loading file?
The program supports loading and converting audio/video files with mainstream encoding. The possible reason of unsupported format's warning is that the source file is incomplete. It needs further analysis, so please contact Support and send us the source file for deep analysis. The program can't support encrypted file with DRM protection in case of copyright issue.
3) Why the audio and subtitle are in gray and unavailable after loading file?
The program reads audio and subtitle on the basis of source file. Please make sure whether the source file has corresponding audio/subtitle.
3. Preview
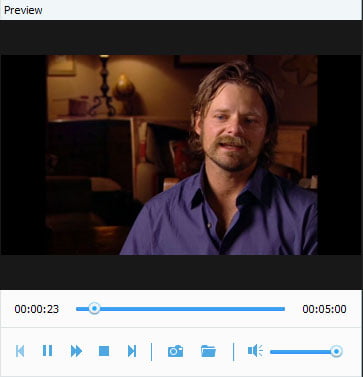
Previous: Play the previous file
Pause/Play: Make the playing pause or replay
Step frame: Move on to the next frame
Stop: Go back to the beginning
Next: Play the next file
Snapshot: Take a snapshot. It also works when preview or pause
Open snapshot folder: Open the folder saved snapshot, which can also be realized by clicking Tools > Preferences > General > Output > Snapshot Folder > Open.
Time Slider: Drag to fix its location and start preview.
Mute: Click to the icon mute or unmute.
Volume: Volume adjusted by dragging slider is only limited to the preview. So if you want to set the output file's volume, you can click Edit > Audio on the menu/tool bar.
4. FAQ of Preview
1) How to check the effect of output files?
Method One: Click Edit in the toolbar, and there are Original Preview and Output Preview there. You can check the output effect in Output Preview.
Method Two: Back to the main interface and check the output effect in the preview window.
2) Can't seek in preview?
You can't seek in preview mainly because the timestamp information is lost or incomplete. Try with other output formats.
Click "Edit" button on toolbar, then click "crop" tag in the Edit window to open the following crop window, or you can click "Clip" menu to choose "Crop" option.
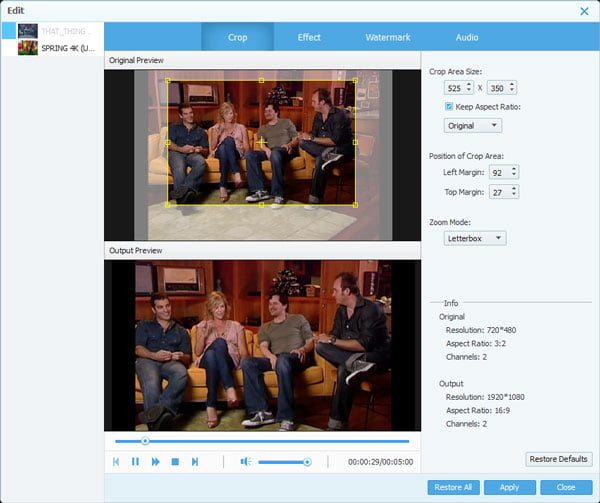
Click "Properties" button on the main interface to look up the original Aspect Ratio of the source file, and click "Settings" button to choose your target Aspect Ratio for output video. Then click "Crop" button to open the Crop window.
Step 1: Choose Aspect Ratio value for the crop frame from the drop-down list on the left side of the window, then check the "Keep Aspect Ratio" to make your dragging action always keep the chosen value. If you want to adjust in any aspect ratio, just uncheck the "Keep Aspect Ratio".
There are four values to choose:
Original: Keep Aspect Ratio of source file.
Crop Area: Keep Aspect Ratio of latest crop frame.
16:9: Keep Aspect Ratio as 16:9.
4:3: Keep Aspect Ratio as 4:3.
Step 2: Just drag the adjustment boxes and move the whole frame to get your preferred crop frame shape, size and position.
Zoom Mode: In order to meet various viewing needs of customers, there are four Zoom Mode (It can take effect only when the output Aspect Ratio is different from the source file Aspect Ratio.) options for you to choose:
Letterbox: Stretch video to reach target Aspect Ratio and keep the cropped frame defined Aspect Ratio simultaneously, and fill in the lacking part with black edge.
Pan & Scan: Stretch video to the target aspect ratio and cut the surplus part.
Medium: A compromise between the above two processing modes to cut the surplus parts and fill in the lacking part with black edges.
Full: Stretch video to the target Aspect Ratio in full screen.
Tip:
1. The crop frame is the yellow line around the movie video. There are eight small adjustment boxes on the crop frame. Each adjustment box allows you to crop the movie video from a different position.
2. You can also just set the crop values (Top, Height, Left and Width) on the lower right part of the Crop window to crop video, and the crop frame will move accordingly.
Click "Edit" button on toolbar, then click "effect" tag in the Edit window to open the following effect window, or you can click "Clip" menu to choose "Effect" option.
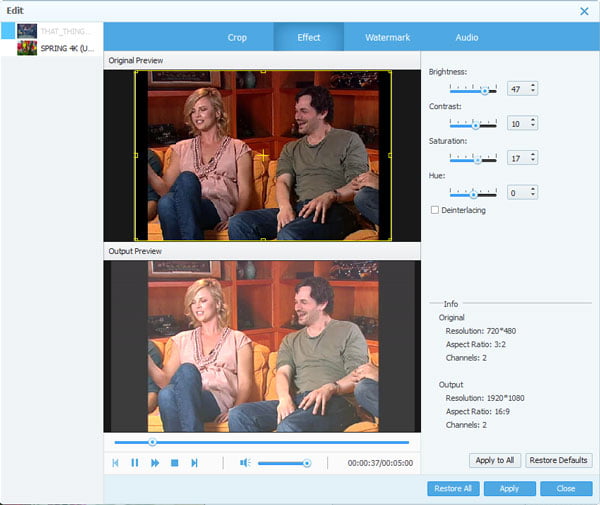
Drag the Brightness, Contrast, Saturation, Hue and Volume Effect scroll bars to get the video effect you want. Also, you can click the up or down arrows on the right side of each scroll bar to set corresponding value.
Brightness: Number ranges from-100 to 100: Adjust screen brightness.
Contrast: Number ranges from-100 to 100: Adjust image contrast.
Saturation: Number ranges from-100 to 100: Adjust image saturation.
Hue: Number ranges from-100 to 100: Adjust color.
Deinterlacing: Recommend to check this option when the loaded source file is interlacing file. Otherwise, the output file is displayed with jarring mark.
Apply to All: Apply to all.
Restore Defaults: Restore all current default.
Restore All: Restore all defaults.
Apply: Save setting.
Close: Close windows.
This software allows you to add text and image watermark for the output video files. Click "Watermark" tag in the Edit window to open the following Watermark window.
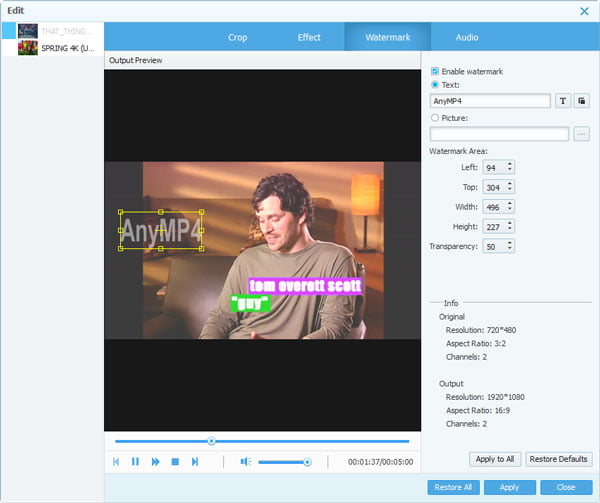
Check the "Enable Watermark", and then select "Text" or "Picture" to add a text or image watermark for source file.
Text: Choose the "Text" to add the text watermark. You can change the font, font style and the size. You can also change the color.
Picture: Choose the" Picture" to add the photo watermark and insert the picture.
Watermark Area: Set the watermark size and location accurately through numerical value or just drag the yellow frame to set the watermark area. Drag the watermark frame to change the location.
Transparency: Change the watermark transparency by changing the value. Numerical range is 0-99.
Apply to All: Apply to all the video files.
Restore Defaults: Restore the current default value.
Restore All: Restore all the default values.
Apply: Save setting.
Close: Close windows.
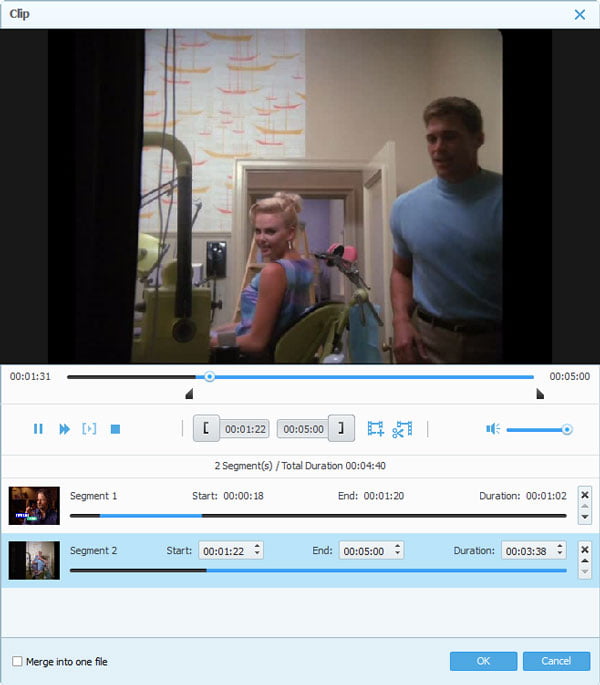
Click Clip on the toolbar or the Edit > Clip on the menu to crop the segment.
FAQ
1) How to get rid of the mosaic in the beginning, gray and black screen and other undesired parts?
Clip function: Users can clip off the undesired parts freely, such as the mosaic, black screen or ads in the source file. After loading files, click Clip in the menu bar or Edit > Clip in the toolbar, drag the clip slide bar or set the Start/End time to get rid of the unwanted parts.
2) How to cut off a middle part of the video file?
Select the file and come to the Clip window, clip and save the corresponding parts. Check Merge into one file in left bottom corner and the clips will be output as one.
1. Why are there interlacing bands when playing the output file?
If the source file is interlaced scanned, you need check Deinterlacing in Edit-effect. There will be bands if it's not checked.
2. How to get rid of the black boarder?
If there's no black boarder in original video, you can set the Aspect Ratio of Profile and source file, which can be viewed by right clicking the file and opening property.
If there's black boarder in original video, click Edit-Crop. And then crop by requirements, cutting off undesired parts. If it's still not the ideal effect, adopt Zoom Mode, check the Output Preview effect and save the satisfying setting.
3. How to adjust the image color?
Click Edit-Effect, adjust the Brightness, Contrast, Saturation and Hue to the satisfying effect.
4. How to adjust the volume of the output file?
If the volume of the original file is too loud/low, click Edit-Audio to adjust the volume.
FAQ
How to apply the Profile Settings to all the files in the list?
Load files and check one. Set the profile and click Apply to all, and then the setting will be applied to all the loaded files.
Click the Settings on the output panel and go into the "Profile Settings" to set the Audio and video parameters.
Click "Preferences" button on the toolbar to open Preferences window.
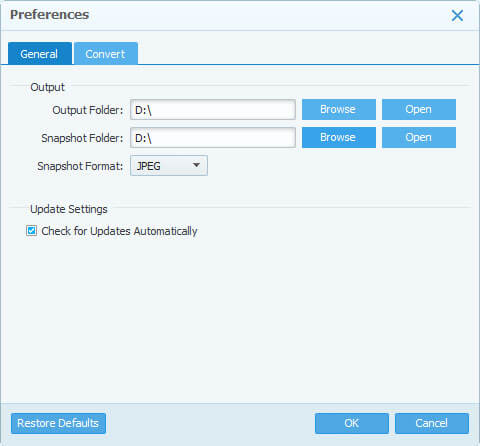
Output:
Output Folder: choose the path to save the output file.
Snapshot Folder: choose the path to save the snapshot.
Snapshot Format: the format to save the snapshot (JPEG, PNG and BMP).
Update:
1. Tick off this item to automatically check update period.
2. Cancel automatically checking update with uncheck. But you can click "Help > Update" on the menu bar to update manually.
FAQ:
1. How to set the path to save the output file?
Method One: Select Tools > Preferences > General > Output > Output Folder. Click Browse to set.
Method Two: Click Browse next to Destination and set.
2. How to set the path to save the snapshot?
Click Tools > Preferences > General > Output > Snapshot Folder. Click Browse to set.
3. How to check for updates automatically?
Click Tools > Preferences > General > Update Settings and tick off Check for Updates Automatically. Set the check period. If there's new version when it comes to check time, you will be prompted to download the latest version.
4. How to cancel the auto update?
Click Tools > Preferences > General > Update Settings and uncheck Check for Updates Automatically.
1. Before converting, you need click the check box before the video file. If you want to check all or uncheck all, right click the file and select Check All/Uncheck All.
2. Before converting, Click Tools > Preferences > Convert so as to set action after conversion done, CPU used number, acceleration and maximum processes. (See detailed operation in System Setting-Convert settings)
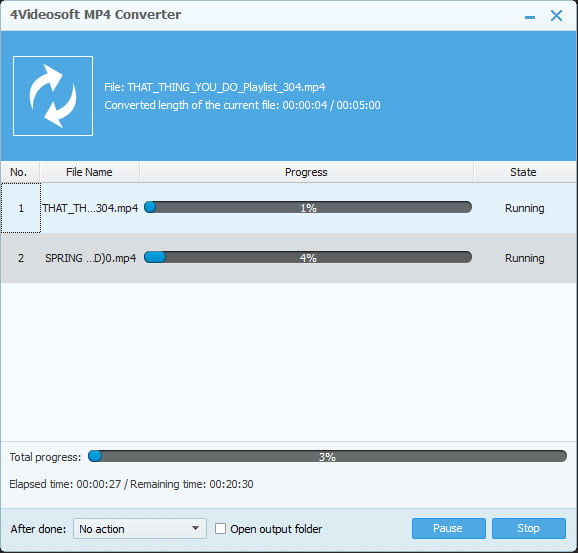
3. Click Convert button below the preview window to start the conversion.
4. Converting interface
FAQ:
1. How to output separate video clips as a whole file?
Use the Merge function to output video clips as one. After loading files, check files you want to merge in the file list area. Click Merge into one file and then those files are exported as one.
2. Why the sound of the output video out of sync with image?
This is probably caused by the lost or incomplete timestamp information. Please preview with local player or our program to confirm whether the sound sync with image.
If the problem exists in source file, please tell our Support about the source of the file and send a fraction of the video if possible.
If the video previews normally, please check whether the problem exists in other output formats. If it does, please contact our Support with detailed parameters. Our Support Email is support@4videosoft.com.
3. Why there's no subtitle display when playing the output video?
Loading the file, see whether the Subtitle select box is available. If it is, please select the required subtitle stream.
If there are subtitle streams and you have checked the required one, please make sure whether you have checked Forced Subtitles. If no forced subtitle, there won't be subtitle in the output file even if you have checked Forced Subtitles. Please preview the output effect in the main interface before conversion.
If there's no subtitle stream after loading, please make sure whether the source file has subtitle information with local player. If it does, please contact our Support and send your source file for test if possible. Our Support is support@4videosoft.com.
4. How to select the correct profile?
Please find the corresponding Profile in the device group, or the supportable formats of your device by looking up the instruction book and relevant materials. Before converting, please set parameters in Profile Settings window. If there's no appropriate Profile, please tell your need to our support.
For example: For Apple devices, please choose the right one from various Apple phone, tablet and Apple TV models in the Profile list. For Android devices, please select Android related profile in the output profile list. For HDTV like Samsung and Sony, you can choose profile from TVs.
5. Audio can't be identified?
Please preview with local player and see whether there's sound. If it plays well, please contact Support and send us a fraction of your file.
6. Video can't be identified?
Please preview with local player and see whether there's image. If it plays well, please contact Support and send us a fraction of your file.
7. Incomplete conversion?
Please preview with local player to see whether the frames are complete. Reasons for incomplete conversion may be:
The information in source file header is not the same as practical information, causing the time length shown differs from practical playing length.
If you have any questions or need any assistance regarding our software, you can contact us through our E-mail: support@4videosoft.com. Our customer service staff will give you a response within one (1) business day.
User Help


