Introduction
4Videosoft DVD Ripper for Mac, the professional DVD ripping software, has the powerful converting and editing features, which can help users easily and freely rip any favorite homemade DVD movie to play on various popular devices for better entertainment.
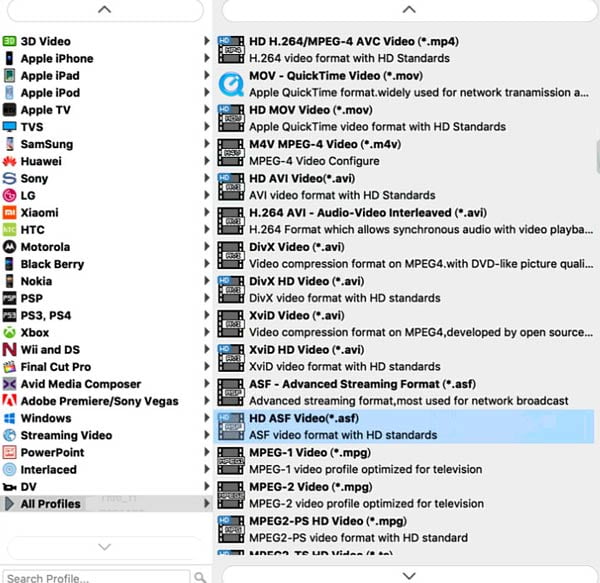
Supporting almost all the popular formats including MP4, VOB, MKV, M4V, AVI, WMV, 3GP, MOV, DivX, XviD, and HD video formats for you, it can rip DVD into the digital formats for your portable player conveniently like Apple devices, mobile phone, PSP, etc. It can also convert DVD to 3D videos for enjoyment.
Besides, it also has powerful editing functions like Effect, Clip, Crop, Watermark, Audio and Merge, which helps users fully recreate and customize the output video.
Supported Input File Formats
| DVD | DVD Disc, DVD Folder, DVD IFO files |
Supported Output File Formats
| Video | H.264/MPEG-4 AVC, H.264, MPEG-1, MPEG-2, MPEG-4, MPG, DivX, XviD, AVI, FLV, MP4, M4V, MKV, MOV, 3GP, 3G2, MTV, SWF, WMV, ASF, DPG, TS, DV, VOB, AMV, WebM |
| Audio | AAC, AC3, AIFF, AMR, AU, FLAC, M4A, MKA, MP2, MP3, OGG, WAV, WMA |
| HD Video | H.264/MPEG-4 AVC, AVI, ASF, MKV, MOV, MPG, TS, WMV, MP4, WebM |
| 3D video | MP4, MKV, TS, AVI, FLV Note: There are three modes for every 3D format: Top and Bottom, Anaglyph, Side by Side. |
Supported Devices
| Apple Devices | iPhone: iPhone 14/13/12 Pro Max, iPhone 12 Po, iPhone 12, iPhone 12 mini, iPhone 11 Pro, iPhone 11, iPhone XS, iPhone XS Max, iPhone XR, iPhone X, iPhone 8, iPhone 8 Plus, iPhone 7, iPhone 7 Plus, iPhone 6S, iPhone 6, iPhone 5, iPhone, iPhone3G iPad: iPad mini 2, iPad Air, iPad 4, iPad mini, The new iPad, iPad 2, iPad 1 iPod: iPod touch, iPod nano, iPod Classic Apple TV |
| Android Devices | Samsung: Samsung GALAXY S20/S10/9/8/7/6, Samsung GALAXY Note 10/8/7/6/5 and so on. Sony, HTC, BlackBerry, Nokia, Motorola, LG, etc. |
| TV | Samsung, LG, Sony, Panasonic |
| Game Consoles | PSP, PS4, PS3, Xbox, Xbox One, Wii, NDS |
| Editing software | Avid Media Composer, Adobe Premiere/Sony Vegas, Interlaced, DV, PowerPoint |
| Window Devices | Windows Phone, Microsoft Surface |
You can download this software from 4Videosoft official page and install it by following the on-screen instructions to install it.
There are limited time length of ripping DVD from the free trial version. For using this software with full features, you need to register it.
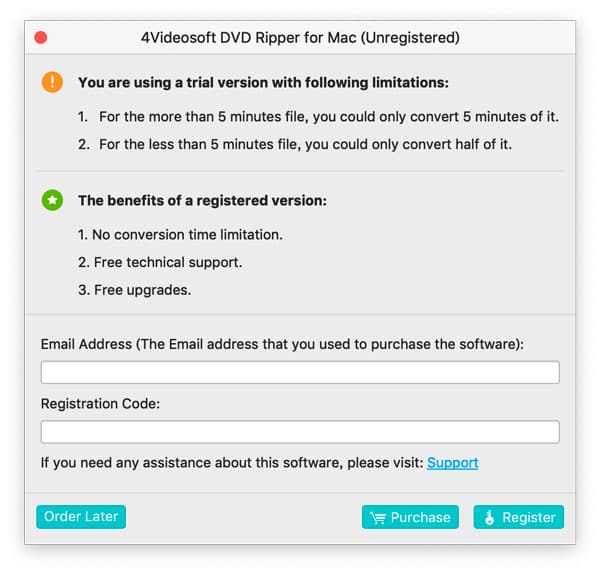
Click Register in the top right corner of the main interface to open registration window. Then input the User Name and Registration Code accordingly.
User Name: User Name is the email address that you fill in the order form.
Registration Code: Registration Code can be found in the order confirmation letter after you successfully purchase it.
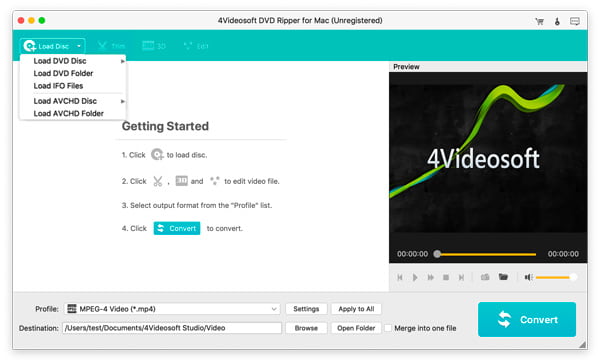
Getting Started
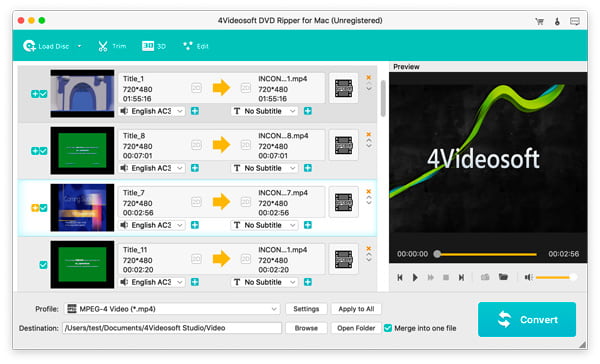
Step 1. Click Load Disc button to select Load DVD Disc, Load DVD Folder, Load IFO Files, Load AVCHD Disc or Load AVCHD Folder.
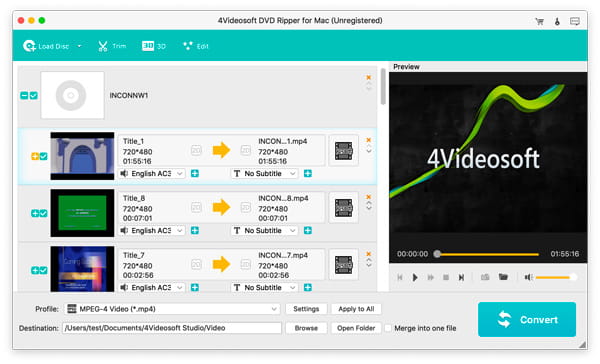
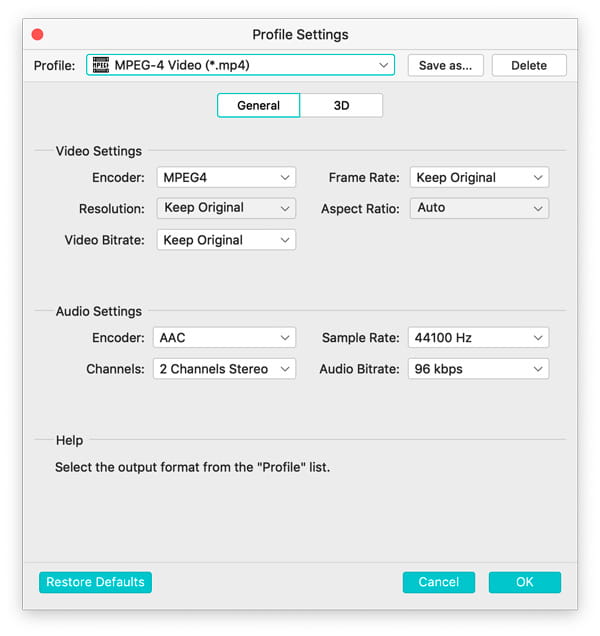
Step 2. Set output format, video/audio encoding settings and output folder for the added DVD files.
If you would like, you can click the settings next to the output format to select Encoder, Frame Rate, Resolution, Aspect Ratio and Video Bitrate to set video and select Encoder, Channels, Audio Bitrate and Sample Rate to set audio. Also you can preset the 3D settings for the output 3D video.
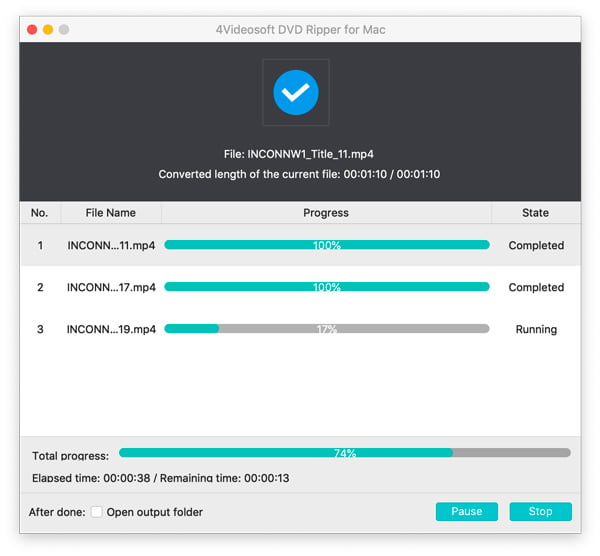
Step 3. Click Convert button to start ripping DVD into the digital formats.
Preferences
Before you making the DVD into the digital conversion, do not forget to make the settings.
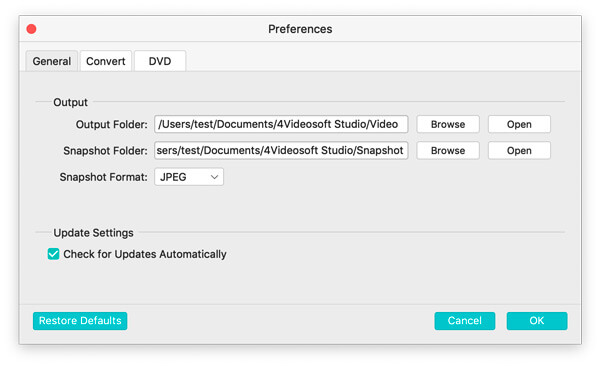
Choose the Preferences option in the menu on the top of the screen to open the Preferences window.
General settings
By default, you will go to the General tab, where you can set the destination for the output folder, and snapshot folder. Moreover, you can also set the snapshot format as JPEG or PNG.
It also gives you the option to check for updating this software automatically.
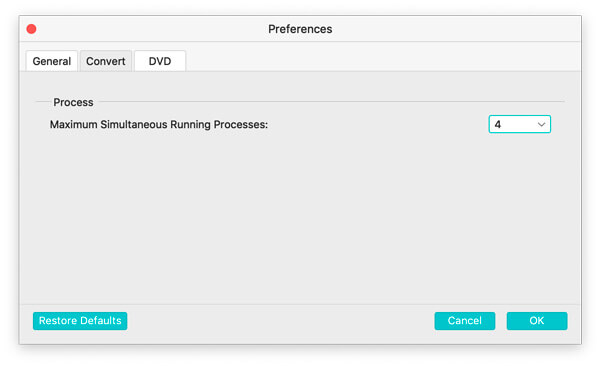
Convert settings
Switch to the Convert tab, where you can set the maximum simultaneous running processes as you wish.
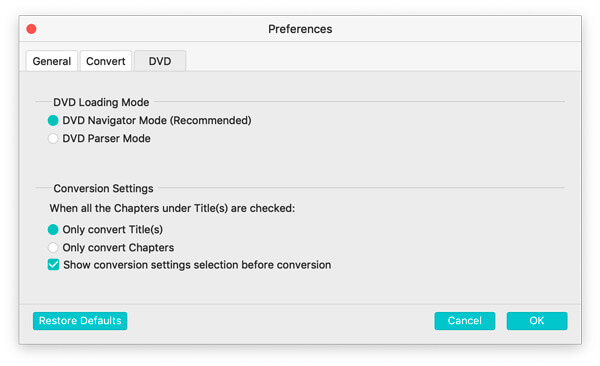
DVD settings
Navigate to the DVD tab, where you can select the DVD loading mode, and conversion settings for titles, chapters, etc.
Editing Before Ripping
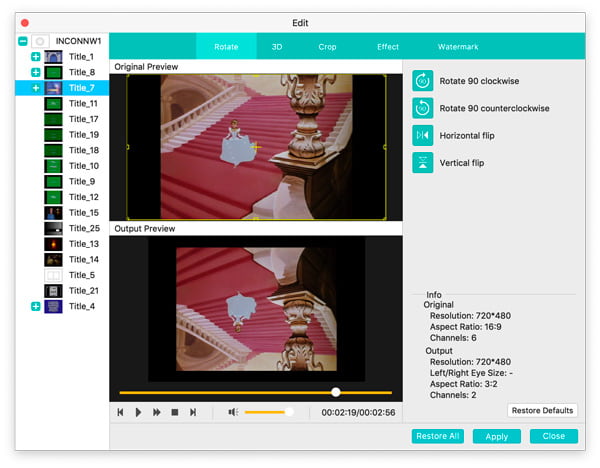
Click the Edit button in the main interface, and then you will be able to start rotate or flip videos.
The 4 options enable you to rotate the videos in 90 counterclockwise or clockwise. Or flip the videos vertically or horizontally.
Click 3D button on the main interface, or you can click Edit button on the main interface and choose 3D option to open the 3D window. After checking the Enable 3D Settings checkbox, and then you can choose the 3D setting modes – Anaglyph or Split Screen according to your device.
Anaglyph: Red/cyan anaglyph, monochome; Red/cyan anaglyph, half color; Red/cyan anaglyph, full color; Red/cyan anaglyph, high quality Dubois; Green/magenta, monochome; Green/magenta, half color; Green/magenta, full color; Amber/blue, monochome; Amber/blue, half color; Amber/blue, full color.
Split Screen: Side By Side (Full), Side by Side (Half-Width), Top and Bottom (Full), Top and Bottom (Half-Height).
3D Depth: Adjust the 3D depth from 1 to 50.
Switch Left Right: Switch left and right eye's image.
Note: For more information about the 3D modes, please visit: 3D Format.

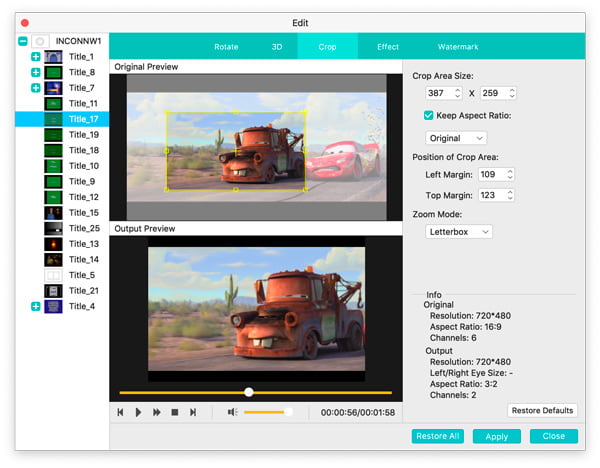
Go to the Crop tab after clicking Edit in the main interface to open the Crop editing window.
Keep Aspect Ratio: Choose Original, Crop area, 16:9, 4:3 or just set the position of Left, Right, Width and Height.
Zoom Mode: Define the size of active portion of output video. Choose Letterbox, Medium, Pan & Scan and Full.
After you crop your video and set the zoom mode, the result can be previewed in the Output Preview window simultaneously.
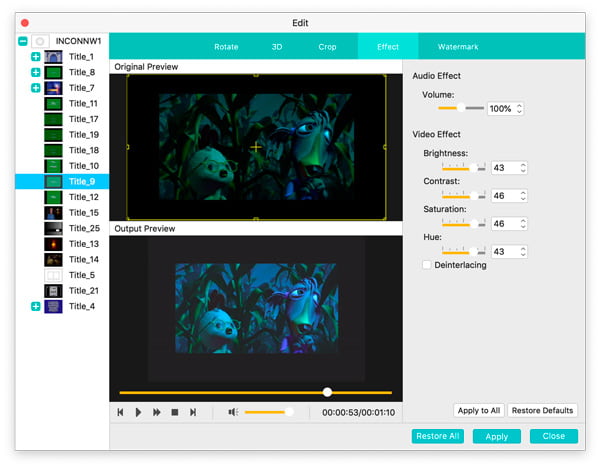
Go to the Effect tab after clicking Edit in the main interface to open the Effect editing window.
Drag the Brightness, Contrast, Saturation, Hue and Volume Effect scroll bars to get the video effect you want. Also, you can click the up or down arrows on the right side of each scroll bar to set corresponding value.
Deinterlacing: To convert the interlaced source file, check Deinterlacing function to avoid mosaic for the output file.
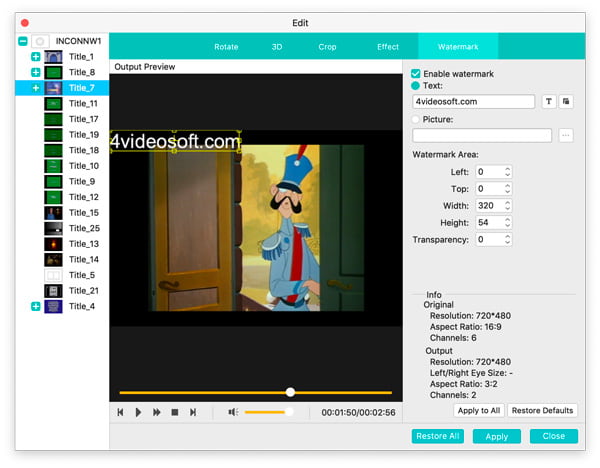
Text: Input the text you attempt to use as watermark in textbox. It will appear on the screen of the video file at the same time. Click Font button to edit the font of text and click Color button to specify the image you attempt to use.
Picture: Check Select watermark picture to add image on the screen of the video file.
You can click the up or down arrows of Left, Top, Width and Height or input corresponding values to adjust the position of watermark. Another way is to drag the watermark to any place in the video screen.
Also, you can click the up or down arrows of Transparency to adjust watermark transparency.
Click Clip button in the main interface to open the Clip editing window.
There are four methods to trim your video length:
Method One: Drag the Start Point scissors to mark the beginning of the clip, and drag the "End Point" scissors to mark the end of the clip when you preview.
Method Two: Click the up or down arrows to get desired time value.
Click OK, and you will see the segment on the file list for conversion.
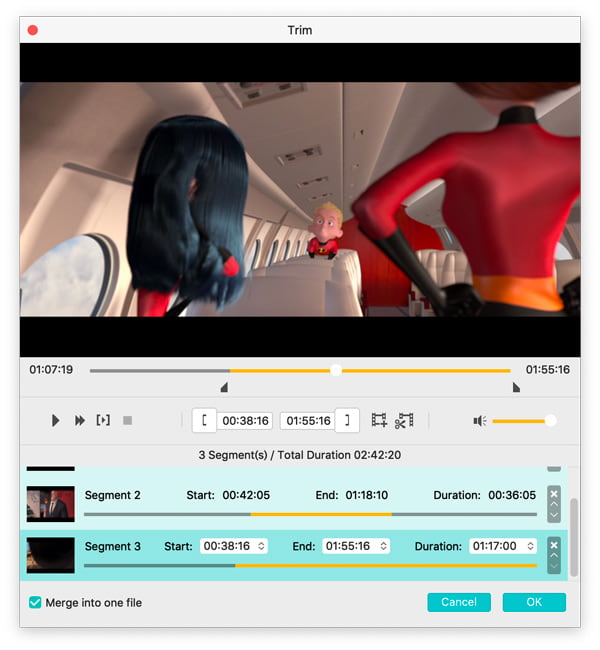
Use the Shift or Command key to select two or more files that you want to join, and then click Merge button. After conversion, these selected files will be joined into one file.
User Support
If you have any questions, please do not hesitate to contact us through our e-mail: support@4videosoft.com.
User Help


