Introduction
4Videosoft HD Converter will bring a lot of surprise and pleasure to you as advanced and easy-to-use conversion software, which has powerful converting function to help you convert all kinds of popular video formats to HD videos those supported by iPod, iPad, iPhone, PS3, Xbox360 and other popular devices. Besides, you can take out the popular audio from HD videos with high quality.
The multiple editing capabilities of 4Videosoft HD Converter enable you to adjust video/audio quality to get the optimized videos, like setting video effect (Brightness, Contrast, Saturation, Hue), merging videos together, clipping video, cropping video, watermarking video and more.
Key Functions:
1. Merge several selected files into one file.
2. Capture your favorite pictures when you preview video.
3. Optional Aspect Ratio Settings to realize different output video play requirements.
4. All the parameters of profile can be provided for you to choose the exact settings for your players, and all those parameters can be saved as user-defined profile for your future use.
5. The whole process of conversion can be finished in a few clicks.
6. Multi-language interface fits for users world-wide.
System Requirements
OS Supported: Windows XP (SP2 or later), Windows Vista, Windows 7, Windows 8, Windows 10, Windows 11
CPU: 1.2GHz Intel or AMD CPU, or above
RAM: 1G RAM or more
Supported Input File Formats
| Video | MPG, MPEG-1, MPEG-2, MPEG-4, MJPEG, VOB, DAT, MP4, DivX, XviD, M4V, TS, MTS, M2TS, RM, RMVB, WMV, ASF, MKV, AVI, 3GP, 3G2, F4V, FLV, SWF, MPV, MOD, TOD, QT, MOV, DV, DIF, MJPG, TP, TRP, WebM |
| Audio | MP3, MP2, AAC, AC3, WAV, WMA, M4A, RA, RAM, OGG, AU, AIF, AIFF, APE, FLAC, CUE |
| HD Video | MTS, TS, M2TS, MPG, MPEG, MP4, WMV, QuickTime HD MOV |
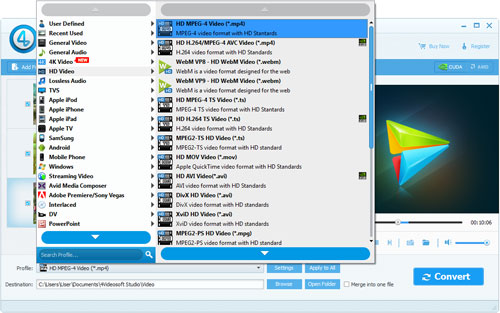
Supported Output File Formats
| Video | MPG, MPEG-1, MPEG-2, MPEG-4, H.264, H.264/MPEG-4 AVC, DivX, XviD, AVI, FLV, MP4, M4V, MKV, MOV, 3GP, 3G2, MTV, SWF, WMV, ASF, DPG, TS, DV, VOB, AMV, WebM |
| Audio | AAC, AC3, AIFF, AMR, AU, FLAC, M4A, MKA, MP2, MP3, OGG, WAV, WMA |
| HD Video | H.264/MPEG-4 AVC, AVI, ASF, MKV, MOV, MPG, TS, WMV, MP4, WebM |
Supported Devices
| Apple Devices | iPhone: iPhone 17/16/15/14/13/12/11 iPad: iPad mini 2, iPad Air, iPad 4, iPad mini, The new iPad, iPad 2, iPad 1 iPod: iPod touch, iPod nano, iPod Classic Apple TV |
| Android Devices | Samsung: Samsung Galaxy Note 3, Samsung Galaxy Note II, Samsung Galaxy Note 8/ 10.1, Samsung Galaxy S 4, Samsung Galaxy S III, Samsung Galaxy S, Samsung Galaxy Tab, etc. Sony, HTC, BlackBerry, Nokia, Motorola, LG, etc. |
| Game Consoles | PSP, PSP GO, PSP 3000, PS3, PlayStation Vita, NDS, Wii, Xbox360 |
| Media Devices | Archos, Creative Zen, Zen player, iRiver, Sansa, Sony Walkman, Zune |
Installation and Uninstallation
Installation
Follow the steps below to install 4Videosoft HD Converter:
Step 1: Download 4Videosoft HD Converter installation file.
Step 2: Double click the downloaded installation file to start installation.
Step 3: Follow the instructions to finish the installation.
Uninstallation
There are two methods available to remove 4Videosoft HD Converter from your computer:
Method 1: Uninstall 4Videosoft HD Converter by the program uninstallation option.
Click Windows Start menu, go to "All Programs", find "4Videosoft HD Converter", and select "Uninstall".
Method 2: Uninstall 4Videosoft HD Converter from Windows Control Panel.
Click Windows Start menu, go to "Settings" and select "Control Panel" to open Windows Control Panel. Then double click "Add or Remove Programs", find and select the "4Videosoft HD Converter" entry, and click "Remove".
Registration
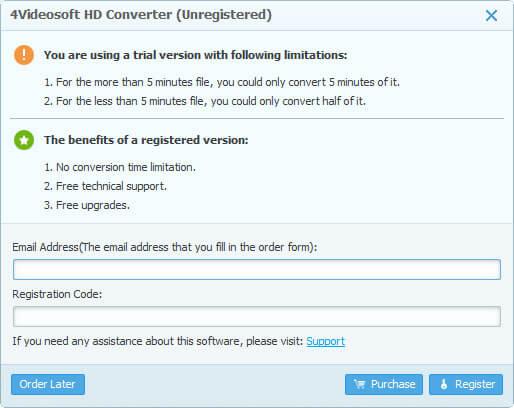
Method One: Click Register from the drop-down menu of Help.
Method Two: Hit the Register icon on the upper-right corner of the program.
Tip: The following situations will cause registration error, please pay more attention to it:
1. Email Address is the email address that you fill in the order form.
2. Registration Code can be found in the Order Confirmation letter after you successfully purchase it.
Advantages of Registered Version:
1.No conversion time limitation.
2.Free update service.
Getting Started
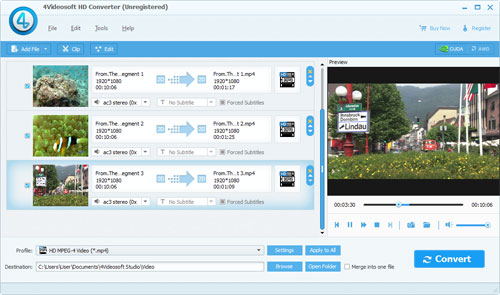
1. Add File(s)
Click "Add File" button to add video and audio files from your local disk.
2. Set Output Parameter
You can set the output settings for the selected file in this area
Note:
You can also set profile for every title from the profile drop-down list at the tail of the every title list.
Click "Settings" button to set detailed profile parameters.
Click "Apply to all" button to apply the current profile to all the files.
Click "Browse" button to specify a location on your computer to save the converted video or audio. If you want to open the output folder, you can just click the "Open Folder" button.
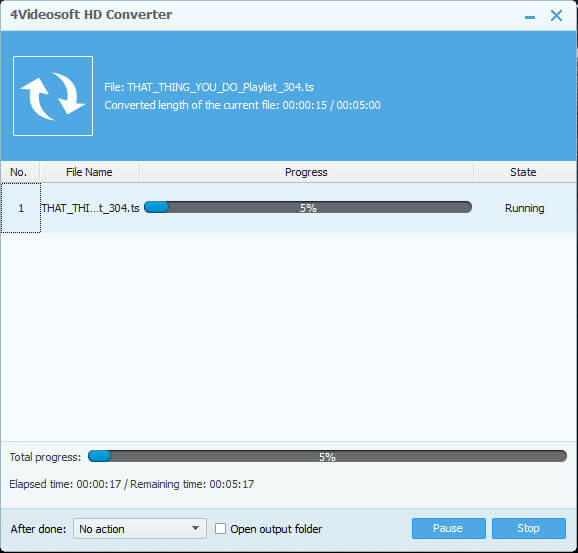
3. Start Converting
Check the file(s) you want to convert in the loaded file list, and then click "Convert" button to start converting.
Note: The program support batch conversion. You can convert more than one files at one time.
There are three methods to add files:
Method One: Click "Add File" button on the toolbar, then choose video, audio files you want in the dialog that opens. Or click Add Video drop-down arrow to choose Add Video or Add Folder.
Method Two: Click "File" to open the file menu, then select Add File or Add Folder option to load your source files.
Method Three: Drag the video and audio files into the file list window directly.
Click "Edit" button on toolbar to open the Edit window, or you can click "Effect" menu to choose Effect option.
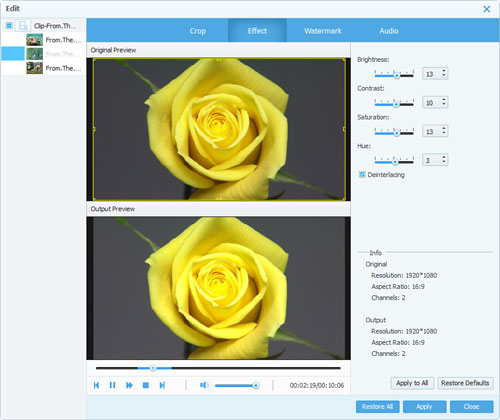
Drag the Brightness, Contrast, Saturation, Hue and Volume Effect scroll bars to get the video effect you want. Also, you can click the up or down arrows on the right side of each scroll bar to set corresponding value.
Tip:
When you convert the interlaced source files such as 720i, 1080i, for you to obtain better output quality, check the Deinterlacing function to avoid mosaics.
Click "Clip" button on the toolbar to open the clip window, or you can click "Clip" menu and choose "Clip" option.
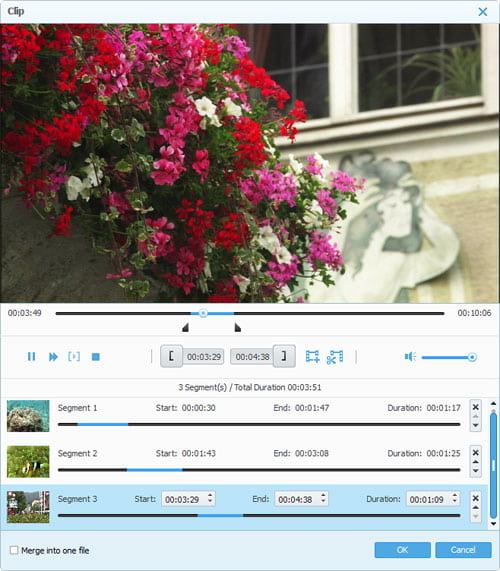
There are four methods to trim your video length:
Method One: Drag the "Start Point" scissors to mark the beginning of the clip, and drag the "End Point" scissors to mark the end of the clip when you preview.
Method Two: Press the "Mark In" button to mark the beginning of your clip and "Mark Out" button to mark the end of your clip.
Method Three: Input the start time in the "Start Time" box, and then input the end time in the "End Time" box and click "OK".
Method Four: Click the up or down arrows to get desired time value.
Tip: After defining the video length, you can click the "Play Section" image button to preview the clip.
Click "Edit" button on toolbar to open the Edit window, or you can click "Crop" menu to choose "Crop" option.
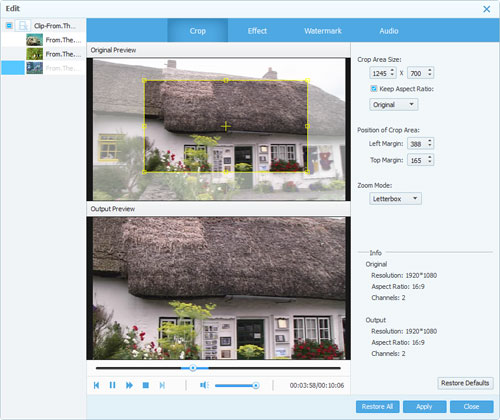
Click "Properties" button on the main interface to look up the original Aspect Ratio of the source file, and click "Settings" button to choose your target Aspect Ratio for output video. Then click "Crop" button to open the Crop window.
Step 1: Choose Aspect Ratio value for the crop frame from the drop-down list on the left side of the window, then check the "Keep Aspect Ratio" to make your dragging action always keep the chosen value. If you want to adjust in any aspect ratio, just uncheck the "Keep Aspect Ratio".
There are four values to choose:
Original: Keep Aspect Ratio of source file.
Crop Area: Keep Aspect Ratio of latest crop frame.
16:9: Keep Aspect Ratio as 16:9.
4:3: Keep Aspect Ratio as 4:3.
Step 2: Just drag the adjustment boxes and move the whole frame to get your preferred crop frame shape, size and position.
Zoom Mode: In order to meet various viewing needs of customers, there are four Zoom Mode (It can take effect only when the output Aspect Ratio is different from the source file Aspect Ratio.) options for you to choose:
Letterbox: Stretch video to reach target Aspect Ratio and keep the cropped frame defined Aspect Ratio simultaneously, and fill in the lacking part with black edge.
Pan & Scan: Stretch video to the target aspect ratio and cut the surplus part.
Medium: A compromise between the above two processing modes to cut the surplus parts and fill in the lacking part with black edges.
Full: Stretch video to the target Aspect Ratio in full screen.
Tip:
1. The crop frame is the yellow line around the movie video. There are eight small adjustment boxes on the crop frame. Each adjustment box allows you to crop the movie video from a different position.
2. You can also just set the crop values (Top, Height, Left and Width) on the lower right part of the Crop window to crop video, and the crop frame will move accordingly.
This software allows you to edit text and image watermark for the output video files. Click "Watermark" tag in the Edit window to open the following Watermark window.
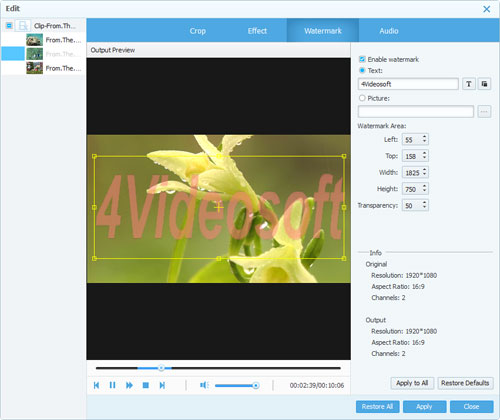
Check the "Enable Watermark", and then select "Text" or "Picture" button to add a text or image watermark to source file.
Watermark Types
Text: Input the text you attempt to use as watermark in textbox. It will appear on the screen of the video file at the same time. Click "Font" button to edit the font of text and click "Color" button to specify the image you attempt to use.
Picture: Click "Select watermark picture" to add image on the screen of the video file.
Adjust Watermark
Position: Click the up or down arrows of Left, Top, Width and Height or input corresponding values to adjust the position of watermark. You can also drag the watermark to any place in the video screen.
Transparency: Click the up or down arrows of "Transparency" to adjust watermark transparency.
In the area of loaded file list, you can create a whole file by joining several video/audio files.
Step One: Use "Ctrl" button on the keyboard to select those files with space intervals. For those files without space intervals, use "Shift" button or press the left button of mouse and move the cursor from bottom to top to select them.
Step Two: Click "Merge" button to create a merged file containing all selected files, and the new file will be displayed at the bottom of the loaded file list.
Step Three: Choose profile for the new merged file and click "Convert" button to output a whole file.
Tips:
1. Click the Move Up and Move Down buttons to adjust the sequence in the merged file for each selected file.
2. Click "Rename" button to name the merged file.
3. Click "Remove" button to delete your selected contents and click "Clear All" button to delete all your added contents.
Click "Settings" button to open the following window.
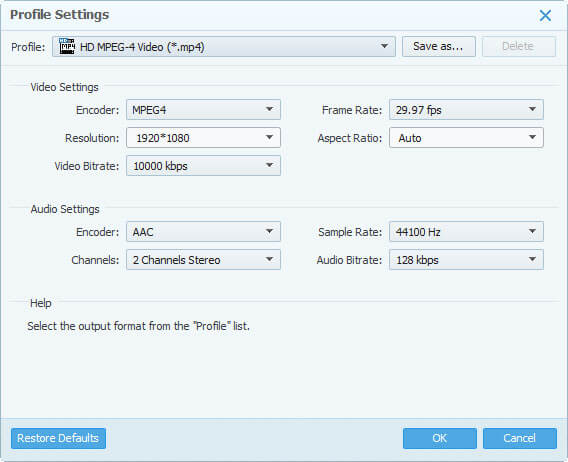
Set video by setting Encoder, Frame Rate, Resolution, Aspect Ratio and Video Bitrate.
Set audio by setting Encoder, Sample Rate, Channels and Audio Bitrate.
Tips:
1. For Resolution setting, you can choose the pre-set resolution from the right drop-down list. Also, you can directly input your own resolution as the form of "XXX*XXX".
2. You can customize the video and audio encoding settings and save them as your own profile. After you have chosen the encoding options, just click the Save as... button and name your profile, and then the profile will be saved in the User Defined list. You can use the customized profile next time by selecting it from the list, also you can delete the profile you defined by clicking "Delete" button.
3. In the Channels setting, you can choose 5.1 channels while the audio channel of your source file is 5.1.
Click "Preferences" button on the toolbar to open Preferences window.
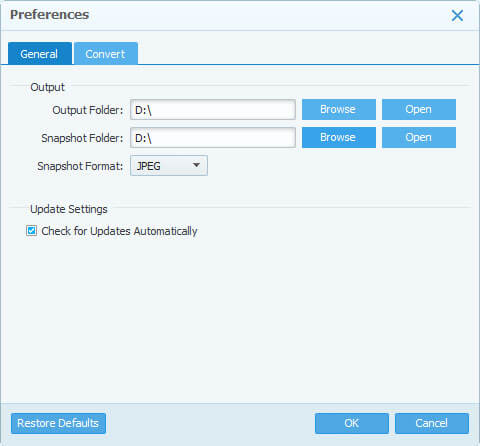
Output:
Click "Browse" button to choose storage location for Output Folder and Snapshot Folder, and click "Open" button to open the corresponding folder. Click the drop-down button to set Snapshot image format (JPEG, PNG and BMP).
Conversion Done:
You can set action for your computer before converting. There are two items in the drop-down list: No Action and Shut Down. If you choose "Shut Down", your computer will automatically shut down after conversion is done, else it will do nothing.
CPU: Choose designated CPU or CPUs to be operated when converting.
GPU: If your computer graphic card model supports NVIDIA® CUDA™ Technology or AMD GPU Acceleration, check the corresponding option to activate the converting acceleration.
Update Settings: You can check the option to set updating automatically.
After finishing all the necessary settings and editing, you can click "Convert" button to begin the conversion.
Show Preview: Check to preview the converted video effect during the conversion.
Shut down computer when conversion completed: If you check this option, this program will automatically shut down your computer after the conversion is finished, so you do not need to wait around your computer.
Open output folder when conversion completed: If you check this option, when the conversion is finished, the output folder will be opened automatically.
After importing the video files, click preview button to view the video in the preview window.

It allows you to capture pictures when you preview:
Snapshot
Click "Snapshot" button, the current picture in the preview window will be captured and saved in the specified folder automatically.
Open Snapshot Folder
Click "Open Snapshot Folder" button to open the storing folder to view the captured pictures.
Tip: To set the target format and storing folder for captured pictures, please click: Set Preferences.
If you have any questions or need any assistance regarding our software, you can contact us through our E-mail: support@4videosoft.com. Our customer service staff will give you a response within one (1) business day.
User Help


