
How to Screen Capture on macOS Mojave and Above with Full Screen and Any Region

If you are running macOS Mojave and later versions, you can get one more choice to screen capture on Mojave. It is the keyboard combination of Shift, Command and 5 keys. You can capture a still image or record screen video on Mojave for free. Then how to use Mojave screen capture options? To record screen and take screenshots on macOS Mojave and above, you can do as the following steps show.
 Mojave Screen Capture
Part 1: How to Screen Capture on Mojave with Annotations
It is true that you can capture a screenshot on macOS Mojave and above directly, but 4Videosoft Screen Capture is still your smart choice. There is a built-in screen capture tool. You can annotate and add shapes to your screenshot. Moreover, you can capture streaming video in one click via hotkeys. The captured image can be saved as JPG, PNG and other formats. Or you can share Mojave screen capture images to Facebook, Twitter, Flickr and more in one click.
- Take a screenshot on Mac with full screen, active window or custom region.
- Add text, arrow, line, callout, pen, rectangle, ellipse and other annotations to your Mojave screenshot.
- Save or share your Mojave screen capture and recording files.
- Screen capture on all macOS versions, including Big Sur, Catalina, Mojave, High Sierra, Sierra and more.
- Lightweight, intuitive and easy to use.
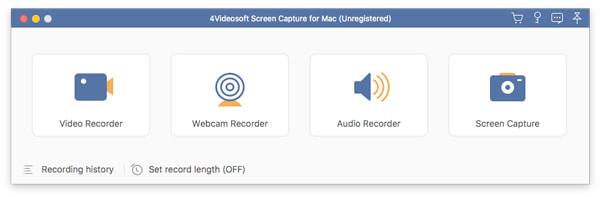
Step 1Free download 4Videosoft Screen Capture on your Mac computer. Launch the Mojave screen capture software after the installation. Choose Screen Capture to screenshot on Mac.
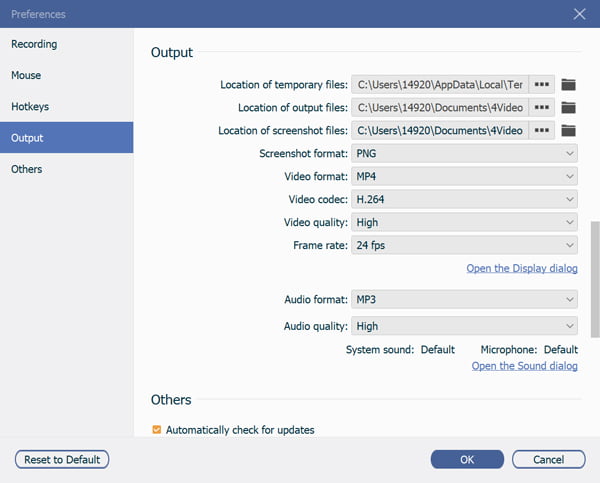
Step 2You can click the Settings icon to access the Preferences window. In the Output section, you can change the screenshot format and location of screenshot files. Then go to other sections to adjust screenshot settings. Click OK to save changes.
Step 3Hover your mouse above any window you want to capture. If you want to screen capture on Mojave with certain area, you can drag your left-click mouse.
Step 4Choose any annotation tool to draw on your Mojave screen capture. You can apply different colors and sizes to markup a screenshot. Use Redo, Undo, Erase, Delete and other options. At last, click Save or Share icon to export your Mac screenshot. You can copy a Mac screenshot to clipboard with its on-screen options as well.
Also read: How to Record Computer Audio with Audacity and Its Alternatives
Part 2: How to Create a Mojave Screen Capture
If you just want to take a quick screenshot, you can use Mac screenshot shortcuts too. From this section, you can get 2 keyboard shortcuts to screenshot on macOS Mojave and above, as well as other compatible Mac versions.
Traditional Mac Screen Capture Shortcut
You can take a snapshot on all Mac OS versions via the following methods. The default screenshot format is PNG.
- 1. Shift + Command + 3 – Take a full page screen capture on Mac
- 2. Shift + Command + 4 – Screen capture on Mac with any portion
- 3. Shift + Command + 4 + Space – Screen capture an active window on Mac
New Mac Screen Capture Shortcut
To screen capture on macOS Mojave and above, you can use Shift, Command and 5 keyboard shortcuts as well. Moreover, this shortcut combination also works for Mojave screen recording. You can choose the tool you need from this Mac screen capture tool.
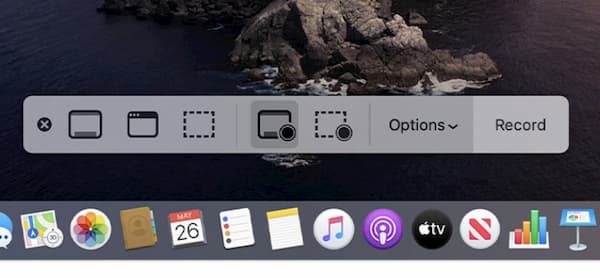
Step 1To activate the screenshot toolbar, press Command, Shift and 5 keys on your keyboard.
Step 2Choose between Record Entire Screen and Record Selected Portion options.
Step 3Select the portion you want to capture. You can take a snapshot of any region on macOS Mojave.
Step 4Click Options to set the output folder. You can save Mojave screen capture into Desktop, Documents, Clipboard, Mail, Messages, Preview and more.
Also read: Microsoft Screen Recorder – 3 Best Methods to Capture Screen Videos as Desired
Part 3: FAQs of Mojave Screen Capture
-
Where are screenshots saved on Mac?
The default Mac screenshot is saved to Mac desktop by default. You can find it with the name of "Screen Shot [date] at [time].png". As for macOS Mojave and above screen capture, you can save it to a pointed folder. Just unfold the Options list to make changes.
-
How to take a scrolling screenshot on Mac?
If you want to capture entire webpage on Mac, you can use a browser plugin or third-party tool. There is no scrolling screen capture feature on Mac. Thus, you need to use full page screen capture extension or app to finish the job.
-
What is the best snipping tool for Mac?
There is no such a snipping tool on your Mac computer. But you can get the similar features to capture screenshots from Skitch, Snagit, Recordit, Monostrap, CloudApp and more. As for the best Mac snipping tool, you need to consider the price, OS, mark-ups and other advanced screen capture features.
That's how to screen capture on macOS Mojave anda bove with or without Shift, Command and 5 keys. To explore more screenshot features, you can free download 4Videosoft Screen Capture on your Mac computer. There are many instant markup tools you can apply on Mac screenshots. Well, this is also your alternative choice when Command + Shift + 5 not working.
Compared with the Mojave screenshot shortcut, the user interface is intuitive and easy to use. After that, you can crop a screenshot on Mac and take other actions. Just choose the thumbnail on the lower right corner on your Mac computer screen. In addition, you can use QuickTime Player as your free Mac screen recording tool as well. All macOS computers are available.
 How to Record PowerPoint with Audio – 2 Most Efficient Methods You Should Know
 HD Screen Recorder – 9 Best Methods to Capture HD Screen Video and Audio Files
 Top 10 GIF Recorders for Windows, Mac and Online Users (Pros & Cons)


